Crystal Tower
(AR1101-1105)
The Crystal Tower is the final area of the game where you must defeat Brother Poquelin.
Monsters: Belhifet, Brother Poquelin, Cryshal Sentry, Everard, Iron Golem, Pomab.
Areas of Interest
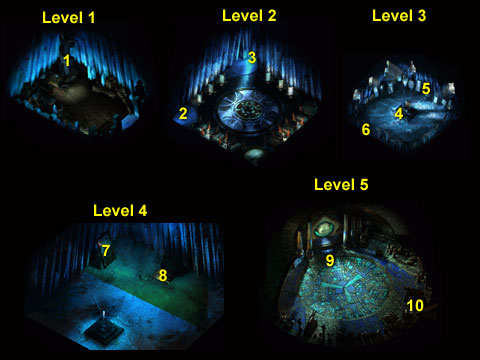
- Level One (AR 1101) Upon entry to this area, you'll have a forced dialogue with Everard (573, 658). He'll ask that you climb the tower and try to find a way to access Jerrod's Stone. If you speak with him again, you can ask for healing. Take the stairs (544, 493) up in the northeast corner of the map to enter Level two.
- Level Two (AR 1102) There is nothing of import in this area, but the area itself is important nonetheless because you can rest here without being attacked. This will come in handy if you need to rest or reset your spells.
The exit (142, 802) to level three is in the western corner of this diamond-shaped map. A tough battle awaits there, so equip any items/cast any spells before going up. If you have a cleric with Protection from Lightning, now is the time to use it, as the bad guys above will hurl lightning galore at your party.
- Exit This exit takes you back down to level one.
- Level Three (AR 1103) Let the lightning bolts fly. Upon entry to this area you will be greeted by Pomab (456, 534), who like his namesake, will regale you with a self-righteous yarn meant to illustrate his great relevance to the matters at hand. He'll tell you about the part he played in sending Hrothgar and the other members of your expedition to their deaths, and will do his best to ensure that you join them. When he finishes speaking, he'll spawn several other False Pomabs. Your job is to find the right one and kill him, while also managing to avoid the Cryshal Sentries and lightning bolts long enough to stay alive. We found the right Pomab by targeting all of the False Pomabs with missile weapons. When you hit a False Pomab, it will show that you hit "False Pomab" on your screen. When you hit the real one, it will just say "Pomab" and lists the damage he takes. Once we found the real one, we concentrated all of our fire on him until he died; when he finally died, all the False Pomabs and Cryshal Sentries died as well. Search his body to find a Wand of Lightning.
- Exit Once you've dealt with Pomab, take the stairs in the northeast portion of the map to go to level four.
- Exit Or, if you need to rest or reset your spells, take the exit back to level two and rest before proceeding.
- Level Four (AR 1104) There is nothing in this area save for a mirror, which acts as a portal to level five for the final battle and Jerrod's Stone (361, 307). If you're ready to rock, click on the mirror (221, 241) and you're on your way.
- Exit If not, go back down the ladder to return to level two and prepare yourself as you see fit.
- Brother Poquelin (AR 1105) Brother Poquelin (631, 494) will open the portal to the lower planes, with the intent of loosing all the souls of hell upon Faerun. But he is foiled by Everard (1463, 927), who like Jerrod before him, sacrifices himself to block the portal, thus ensuring that countless lives will be saved.
Brother Poquelin is less than impressed, saying that it's only a matter of time before he opens it again. Shortly thereafter, Brother Poquelin reveals his true form. He is actually Belhifet, a full-fledged demon from the pit. From that point forward, the battle is on. We prepared for this battle with every defensive spell in the book, not to mention Haste. Unfortunately, the first spell Belhifet casts is Dispel Magic, which deprived us of our well-planned defenses. Despite the initial setback, the battle turned out to be relatively easy. We cast Power Word: Silence on Belhifet, then proceeded to slaughter him, melee style, with +3 weapons and above. We concentrated all of our attacks on him, while completely ignoring the iron golems, who seemed content to whack away at our mage. Fortunately, she saved Stoneskin for the battle, and emerged unscathed. Belhifet fell soon thereafter, and the end game cut-scene played, which both extolled our virtues and left the door open for a sequel and/or expansion.
Just for giggles, we also engaged Belhifet in melee combat without the benefit of any spellcasting. We still killed him, but took quite a bit of damage from his spells while doing so. Part of the fun is playing with different strategies, so just save before entering the final battle and experiment until you find a method that suits your party. One last note: your party will be surrounded on all sides by traps upon entering the area. We didn't have the time or the inclination to disarm them, and let the chips fall where they may. But disarming them might make things a bit easier.
- Exit Upon entry to this area, you will bear witness the dramatic scene just described.
Walkthrough Index
|