|
|
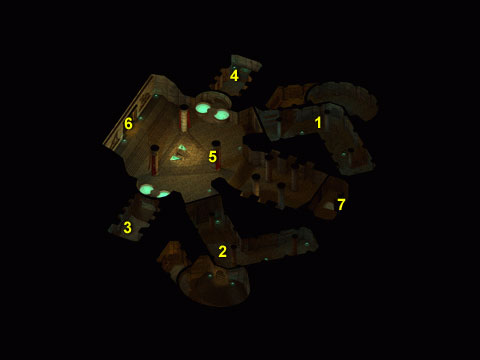
Tomb of Kresselack, Level Two
(AR3502)
You will enter one door, then go through another to get to the main area. As you walk forward, there is a trap that we could not detect that spawns tattered skeletons. As you move forward into the main area, be prepared for a magic user. A skeletal mage (765, 884) lies in wait, along with an imbued wight, which shoots fireballs at the first party member it sees, and other undead. We found Bracers AC 8 on the skeletal mage. You will find a switch (930, 900) on the first column you come across. You can't activate it now, but remember where it is, as you will need to use it later. In the middle of the main area, we found a sarcophagus (650, 831) containing a scroll of Agannazar's Scorcher, three Mummy's Tea, a Potion of Insight, a scroll of Cure Moderate Wounds, a Wand of Sleep, and "Dazer," a magic club (2-7 damage, +1 THACO, 5% chance to stun). If you continue forward, you will see what looks to be a door--you can't open it now, but again, remember where it is. The other rooms of this area are as follows:
Monsters: Ghast, Imbued Wight, Skeleton, Skeleton Archer, Skeleton Mage, Tattered Skeleton, Temple Guardian, Zombie.
Areas of Interest
- Northeast Rooms You need the Mausoleum Key to open the door to this area. In the first room, kill the skeletons and then search the crypts in the walls to find jewelry. In the second room, you'll find zombies and not much else. In the third room, on a table (1454, 441), we found the Plain Key and a scroll of Slow Poison.
- Southeast Rooms You need the Mausoleum Key to open the door to this area. In the first room, search the crypts. We round a Sling +1 (1079, 1410), a Skull, and normal Bracers (1754, 1540). In the second room, the first thing you'll find are traps--the entrance is protected by three of them. You will be attacked by temple guardians and ghasts. In the third room, which requires the Plain Key for entry, you will find the body of a skeleton (572, 1729) carrying a scroll of Hold Person and the Black Wolf Talisman (+1 to AC, +10 to max hit points, +10% cold resistance).
- Southwest Room No items, but is still protected by an imbued wight and tattered skeletons.
- North Room There are two traps here, located just beyond the entrance. Inside the room we found a sarcophagus (1190, 172) containing a Morning Star +1 (3-9 damage, +1 THACO), Wand of Armory (casts Shield or Ghost Armor on user), a scroll of Silence 15' Radius, and a Potion of Regeneration.
- Switch After you have the Black Wolf Talisman , you can unlock the switch (930, 900) and pull it (on first column you come across from the entrance to the area) to open the exit to level three.
- Exit Once opened, this exit takes you to level three.
- Exit This exit takes you back to level one.
Walkthrough Index
|
|
|