Wyrm's Tooth Museum
(AR7001)
How you handle the slave quest depends on your personal inclinations. You can either help them escape or help Kerish and the frost salamanders keep them in bondage. Both methods are described below, as are the primary components of the quest: the slaves and the salamanders.
Monsters: Frost Salamander, Greater Ice Troll, Winter Wolf.
Areas of Interest
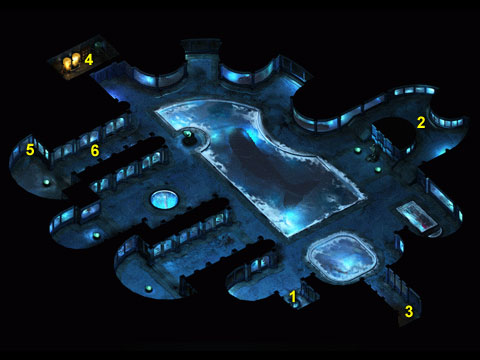
- Entrance to Slave Pen Go down these stairs (2352, 2391) or enter one of the two doors in the area just inside the triple doors (AR7002) to find the slaves (AR7003), who are being held prisoner by the frost salamanders. In the far western end of the room, you will find Soth (97, 336). Ask him about the area and the books in the library. He will eventually give you a book on engineering (and 112,500 XP) that will enable you to fix the bridge and go to the area where you will find Joril. We'll talk about that area later.
In the eastern end of the room, you will find a table (1358, 322) with a note. Read the note to find out that Joril Frostbeard has slain his father, Kreg, to attain his badge (and thus his lieutenancy). Just on the other side of the table you will find Gareth (1425, 314). He'll tell you of the plight of the slaves and of a woman named Vera, who turns out to the be the leader of the slave revolt. He'll also mention that they've found a way to escape, but need a key to do so. He'll ask that you retrieve the key from Kerish, leader of the frost salamanders.
Once you've finished speaking with Gareth, go up the stairs in the middle of the room to enter the museum (AR7001), where you will find the Kerish and the frost salamanders. Inside you will be greeted by frost salamanders; ask to speak to their leader and they'll take you to see Kerish. Note that if you choose to fight the salamanders, you can retreat to the slave area and rest without being attacked, which might be helpful, as the salamanders and their minions can be tough to overcome.
- Kerish When speaking to Kerish (3389, 990) you will have several dialogue options. We recommend saying that you are an adventurer. He won't believe you, and will think that you are a spy sent by Marketh, one of his superiors. If you ask him questions, he'll tell you about the area and Joril, among other things. He'll also ask for your assistance in dealing with the slaves. Say you will consider it, then ask for the key, which turns out to be Dugmaren's Key. You'll receive 60,000 XP for acquiring the Key. This way, you are free to roam around the museum without being accosted by the large number of unruly salamanders, winter wolves, and greater ice trolls who inhabit the museum. You will be able to explore at will, thereby lighting up the map, which may come in handy if you choose to fight the salamanders later on. This will also afford you the opportunity to take in some of the artwork, which is truly outstanding. It's not often you get to see frozen whales, sharks, etc. Note that you will take cold damage if you stand next to the salamanders for very long.
- Exit This exit takes you back to the outside area, and might come in handy should you need to beat a hasty retreat.
- Machinery Room This is the room (705, 426) where you will find the machinery that Vera used to activate the heat in the library. It's really not that important after all, but it is at least part of the story. It's behind a door in the northern area of the map.
- Vera Speak with Vera (226, 1252) and she'll tell you a bit about herself and the slaves, and will implore you to help them.
- Frost Salamander A frost salamander (786, 1218) will be standing in the corridor leading to Vera. If you speak to him, he'll tell you that he's been hearing strange sounds coming from Vera's location. Tell him there's nothing there to gain experience. You can also give her up--but we advise against it at this point.
Now you're ready for the great moral quandary. If you despise lowly slaves and want to make their life difficult, you can kill Vera. She has Leather Armor +2, a Dagger +2 (3-6 damage, +2 THACO), and an Amulet of Protection (+1 to AC and saving throws). Tell Kerish of the deed and you'll gain 80,000 XP. He'll ask that you return the rest of the slaves to him. They won't come willingly, but you can kill them and speak to Kerish again for 60,000 XP.
If, however, you are a good soul and wish to free the downtrodden slaves, return Dugmaren's Key to Gareth and free the slaves for 60,000 XP. Then go back and speak to Vera for 80,000 XP. Getting to Vera could pose a problem, because the salamanders, winter wolves, and greater ice trolls will be hostile upon your return to the museum if you have freed the slaves. If you kill them all, you'll find assorted gems on the salamanders and trolls, and pelts on the wolves. Be sure to find and kill Kerish (3389, 990), as he has some rather spiffy magic items: Spear of Kerish (4-11 damage, +3 THACO, +10% fire resistance, 5% chance of 1-6 cold damage), and the quarterstaff "Spendelard's Protector" (2-7 damage, +1 THACO, +1 AC, +1 save vs. spells).
After completing the slave quest, you are ready to enter the ice caves and slay Joril, keeper of the second badge.
Walkthrough Index
|