Upper Dorn's Deep Barracks
(AR6002)
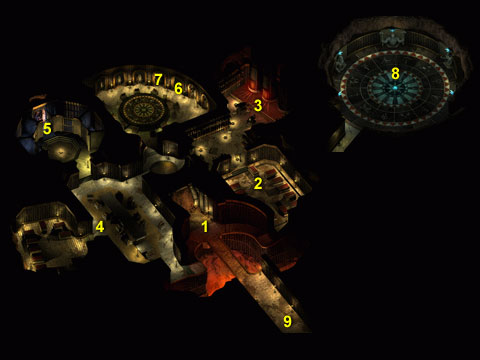
Upon entry to this level, you will not be attacked. Why not, you ask as seemingly every other level begins with you being pounced upon? Well, that's because there is a large concentration of evil minions a few steps north from the entrance. If you need to rest, you can do so before moving forward.
Monsters: Drow Spellsword, Drow Sorcerer, Drow Vanguard, Neo-Orog Avenger, Neo-Orog Marauder, Neo-Orog General, Orc Elite.
Areas of Interest
- Welcoming Party Orc elite, two drow spellswords, two drow sorcerers, and neo-orog marauders greet you as you move up the passage. You would be well-advised to walk slowly toward them, otherwise, they'll all attack at once, and that can get pretty ugly. Be sure to search the bodies of the sorcerers and the drow. You'll find Daggers +1 (2-5 damage, +1 THACO) on the sorcerers, and Long Swords +1 on the drow (2-9 damage, +1 THACO).
- Eastern Chambers There are two relatively large rooms in this area. There isn't much of interest in this area, save for more neo-orog marauders. Kill them and walk through the doorway in the northern area of the room. You will see what looks to be a weapons depository in front of you, and an open area to your right. There is nothing of interest in the depository section, but don't walk into the open area to the right until you're ready to fight.
- Sorcerer You will be attacked by drow spellswords and vanguards, as well as a drow sorcerer. Kill them, and search the area. You'll find Long Swords +1 (2-9 damage, +1 THACO) on the spellswords, a Dagger +1 (2-5 damage, +1 THACO) on the sorcerer, and Long Swords +1 , Bolts of Biting and Chain +1 on the vanguards. Behind where the sorcerer was standing you will see a pile (2398, 643) of loot, including Mithral Field Plate +2, an Axe of Caged Souls (4-11 damage, +5 damage and THAC0 vs. cadaverous undead (+3 otherwise)), a Heavy Crossbow of Accuracy (+2 damage, +7 THACO), ten Bolts of Lightning (1-8 damage, 4-16 of electrical damage, save vs. breath for half), and ten Bolts of Biting (1-8 damage, thirty poison damage in fifteen seconds, save vs. death for none).
- Western Chambers There is nothing of interest in these two rooms, except more assorted orogs, including neo-orog generals (whom carry High Quality Two-Handed Swords), and a few orc elite.
- Exit As you enter the room, you will be attacked by more drow spellswords and vanguards, who are carrying their stock drow equipment as described above. You will see a door here--it leads to the umber hulk labyrinth, but don't worry about it yet. Gather the loot and proceed to the northern room with the large table.
- Switch In the northeast section of this room, you will find a secret door and a dwarven statue (1683, 540) that seems to serve as a switch (it's the only one with an arm extended). You will notice that the switch is not active, and will intuitively surmise that the secret door has something to do with it.
- Secret Door Before entering the secret room (1560, 477), go to the umber hulk labryinth. Also, take a good look at the large table, as it holds the solution to the puzzle that lies beyond the secret door. If you want to solve the puzzle on your own, stop reading right now and give it a shot. If not, read on.
Puzzle Answer: If you look at the table, you will notice that the black areas are etched with symbols, each corresponding to a ring around the table. Remember them, as you will need them when you enter the secret room. Once the symbols are noted, enter the secret room (AR6010). Upon entry, you will notice that there are symbols on the floor. The design is similar to the one on the table, but there are more symbols. Don't step on the symbols, as they are protected by Lightning Bolt traps.
To disarm them, walk around the perimeter of the circle until you reach the northeast section of the room. Step on the symbol that looks like a hammer striking an anvil (905, 412). This will disarm the traps on the outer ring of symbols. Then walk back around the perimeter to the southern part of the room. Step on the symbol that looks like an 'X' (587, 741). This will disarm the traps on the second ring of symbols. Now walk to the eastern half of the room, being careful not to step on the inner ring of symbols, and step on the symbol that looks like two joined rings (535, 522). This will disarm the remaining traps.
Once done, return to the table room. The switch (1683, 540) on the dwarven statue will be active; flip it and return to the secret room. You'll see a staircase (819, 616) leading down to the gear room (the gear operates the retractable staircase). In this room (AR6011), you'll see a body near the base of the stairs. Before going near it, check for traps as there is a Fireball trap near the body. Next to the body, you'll find Dver's Note (469, 440), Dver being the unfortunate soul who is lying on the ground. The note mentions his fate and the umber hulk (Saablic Tan) you met earlier.
- Exit When ready to enter the area of the dwarven forge, which connects to the dwarven tombs, walk through the doorway (484, 466) in the center of the secret room.
- Exit This exit takes you back out to the Upper Dorn's Deep main area.
Walkthrough Index
|