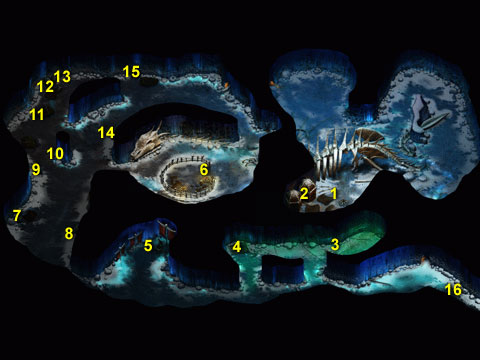
Frost Giant Caves (AR7004)
Enter this cave by repairing and crossing the bridge in the southwest corner of the glacier (using the book you got from Soth). You will fight everything from white wyrms and frost giants to black ice knights.
Monsters: Black Ice Knight, Frostbite, Frost Giant, Glacier Yeti, Greater Ice Troll, Joril, Kontik, Snow Troll, White Wyrm, Winter Wolf, Yeti Chieftain.
Areas of Interest
- Kontik's Cave After you kill the winter wolves that greet you at the entrance, you will see an opening (3399, 2092) on the north wall. Enter it, kill the snow trolls and other bad guys guarding the entrance, and start nosing around. You'll notice that the area is a massive room that takes up the entire northeast section. You'll also notice what looks to be a giant dragon or wyrm skeleton. There is not much of interest in the area, save for monsters, until you reach the southwestern corner of the room. You will come across a door (2164, 703) in the northeast section. Don't worry about it now--it just leads back out to the ice caves.
In the southwest area, you will see a passage leading through the rib cage of the skeleton. Don't enter it unless you are really ready to rock, because five black ice knights and Kontik are waiting on the other side. Kontik (2637, 1605) is a follower of Auril, and has been dispatched to wreak vengeance upon you for what you did to Lysan (the priestess you killed in the Vale of Shadows). Kill them all, then search Kontik's body for a Robe of the Evil Archmagi (AC 5, 5% magic resistance, +1 to saves, only useable by evil characters), Long Sword +3 "Enforcer" (4-11 damage, +3 THACO, +5% magic resistance, memorize one additional 1st and 2nd level spell, only useable by fighter/mages), Ring of Protection +2 (+2 AC, +2 to saves), Kontik's Ring of Wizardry (doubles amount of 1st and 2nd level mage spells), the dagger "Breath of Auril" (4-7 damage, +3 THACO, +1 to intelligence, -1 to charisma, 100% cold resistance, -50% fire resistance, two charges of Cone of Cold per day).
- Huts There are also two huts near Kontik, both containing treasure. West hut (2482, 1577) had a Chain Lightning scroll, a Globe of Invulnerability scroll, a Potion of Mirror Eyes, and a Barrel of Pure Water. Return the water to Valestis in Severed Hand arboretum for 120,000 XP. Or if you want to do it all at once, wait until you get the seeds and animals in Lower Dorn's Deep and then return to him. The southwest hut (2395, 640) had an Otiluke's Freezing Sphere scroll, a Potion of Regeneration, a Potion of Stone Form, and a Potion of Storm Giant Strength. After gathering the goods, exit the way you came in and proceed to Frostbite.
- Frostbite Frostbite (2522, 2038) it turns out is a white wyrm. Speak to him and you'll find out that he is a devout eater of humans. Kill him and his cohorts, then search the snow (2808, 1974) in the area behind where you met him to find assorted gems, including two diamonds. In another spot (2874, 1896) we found broken armor, Mithral Plate +2, Long Bow of Marksmanship (+2 damage, +3 THACO), and the Cittern of War (bardic instrument that casts Emotion: Courage, centered on the user).
- Altar Walk to the western end of the room and you'll find an altar (1908, 1950) made of human bones. Inside, we found: a Potion of Power, two Healing Potions, a Symbol of Pain scroll, Gauntlets of Infernal Damnation (cursed, casts Shroud of Flame on wearer), Red Potion (intelligence set to 25, wisdom and strength set to 3, +50% resistance to all magical damage, lasts 24 hours), and a Ring of Holiness (grants one extra 1st through 4th level priest spell). After you are finished looting, you are ready to meet Joril and the frost giants.
- Joril Continue walking west along the passage and you'll run into two frost giant guards. What you do next depends on your alignment. There are slaves in the caverns, whom we will discuss later. If you have no desire to free them, strut on past the guards and speak to Joril (1175, 2051), who will be standing next to a throne in the room to the west. You can trick him into giving you his badge if you've read the note you found in the other slaves' quarters (the one on the table next to Gareth). This may depend on intelligence, so have a smart character do the talking. If you choose this option, you'll gain 80,000 XP and will be free to explore, but will lose out on Joril's items and the experience gained by freeing the slaves, not to mention all the experience for killing the frost giants.
If you're a good-hearted soul, goad the guards into a fight. That way, you won't have to fight all the frost giants in the next room at once, although every giant you see from that point on will be hostile. Or if you're really sneaky, trick him into giving you the badge, get the experience, end the conversation, then kill him anyway. This makes for a tougher battle, however, as you'll quickly be surrounded by giants and winter wolves. Remember to hang on to the badge. Joril carried: the morning star "Static Star" (5-11 damage, +3 THACO, 15% chance target is slowed, 25% chance of 2-6 electrical damage), Chain +2, and Joril's Axe (4-15 damage, +3 THACO, +1 to constitution, -1 to dexterity). After dealing with Joril, take the passage west to the cavern storing much treasure. For now, walk north along this passage and take the first right to find the slaves.
- Slaves You will see what looks to be a slave pen. Near the entrance to the pen you will encounter Daven Berenson (1675, 1395). Speak to him to complete two quests. You'll get 120,000 XP (420,000 XP if you kill Frostbite after talking to Daven) for killing Frostbite and saving the slaves, and you'll get another 180,000 XP for killing the guard that blocks the cave that they intend to use as an exit. The cave is just north of the slave pen. It's not important for you to enter, as it just leads back to the Kontik's cave. Once finished, go back to the western part of the cavern and loot the containers of treasure.
- Treasure Container (141, 1761) with two Healing Potions, a Potion of Heroism, and a Raise Dead scroll.
- Treasure Container (609, 1830) holding a Potion of Invisibility and a Potion of Insulation.
- Treasure Container (290, 1362) had a Wand of the Heavens (Flamestrike 8-48 damage, save vs. wands for half), Potion of Genius, Potion of Fortitude, and Insect Plague scroll.
- Treasure Container (416, 1248) with a Potion of Mind Focusing and Potion of Mastery Thievery (+40% to lock picking and pick pockets).
- Treasure Container (323, 903) filled with a Dagger of Venom (3-6 damage, +2 THACO, six poison damage per round up to a total of fifteen), a Spike Stones scroll, a Potion of Firebreath, and Potion of Cold Resistance.
- Treasure Container (x366 y656) storing a Cloak of Protection +2 (+2 AC, +2 saves), a Champion's Strength scroll, a Potion of Cloud Giant Strength, and Potion of Clarity.
- Treasure Container (426, 636) with Leather Armor +2, Dagger +2 "Longtooth" (3-8 damage, +2 THACO), a Potion of Agility, and a Potion of Absorption.
- Treasure Container (884, 1090) holding a Potion of Magic Shielding, Potion of Invulnerability, thirteen Darts of Stunning (1-3, target must save vs. spell or be stunned for seven rounds).
- Treasure Container (1074, 562) that had an Oil of Speed, an Elixir of Health, a Blur Deck (casts Blur on user for 1-12 rounds), and a Scimitar +3 "Frostbrand" (4-11 damage, +3 THACO).
- Exit Once finished pillaging, exit the ice caves. Once outside, walk to the northeast corner (3608, 179, AR7005) and enter the cave (AR7000). What you do from here is up to you. If you wish to return to the museum, you can take this exit (569, 210). If you need to stock up or sell anything, go to the northeast corner of the map and travel back to Kuldahar to re-supply yourself. You can also travel to Valestis in level four of Corellon's Tower in the Severed Hand if you want to get rid of the barrel of pure water. Note that if you go to Kuldahar (or anywhere else), you'll have to come back to this area to begin Chapter 6. You'll be taken back to this map if you travel to Wyrm's Tooth from anywhere else on the world map. Once ready to go, enter the cave (1104, 649) in the southeast corner of the map to begin Lower Dorn's Deep and Chapter 6.
Walkthrough Index
|