Vale of Shadows
(AR3000)
The Vale of Shadows, as the name implies, is filled with various kinds of undead. Here you will encounter everything from skeletons, zombies, and ghasts, to the more powerful mummies and imbued wights. While we will not mention every skeleton you come across, we will warn you of especially difficult enemies. Your goal is to find out whether the legions of undead are somehow to blame for the troubles in Icewind Dale. In order to find the answer to this question, you must investigate the five caves located in the Vale, as well as the Tomb of Kresselack. Note that you will find various keys in your travels here--be sure to hold on to all the keys, holy symbols, and talismans you encounter. You'll need them to progress through the Vale.
Monsters: Armored Skeleton, Carrion Crawler, Lysan, Ghast, Ghoul, Lesser Shadow, Skeleton, Yeti, Yeti Chieftain, Zombie.
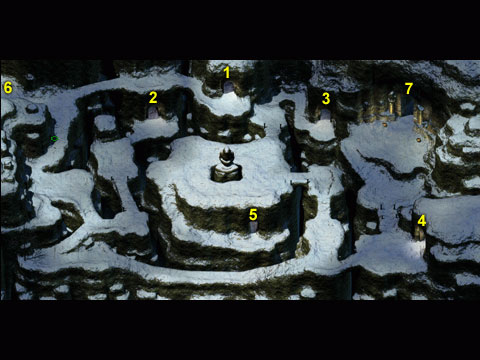
Areas of Interest
- Cave One (AR3401) Upon entrance to this cave, you will be immediately attacked by skeletons and zombies. Kill them, and take a few steps north from the entrance. There you will find some items hidden on a skeleton that is hanging on the wall (774, 670): Studded Leather, a Luck scroll, a Potion of Agility, and a Cursed Antidote. Travel up the left side of the map, and continue to follow that passage around to the right. You will come to two passages that fork left and right. The left side is trapped. Disarm the trap and continue up the left side to find another item-bearing skeleton hanging on the wall (941, 143): a Stinking Cloud scroll, Arrows, and a Short Bow. The path to the right is also trapped; disarm the trap to proceed back around to the entrance. Be sure to check the skeletons that you killed at the entrance as they sometimes carry high-quality long swords (1-8 damage, +1 THACO), which will likely represent an improvement to what you are currently wielding.
- Cave Two (AR3101) When you enter, you will be attacked by skeletons and ghasts, as well as a ghoul. Straight ahead from the entrance you will see what appears to be a seated idol (361, 471) of some sort (it looks like the large statue outside). Search it to find the Gate Key, an Identify scroll, a Healing Potion, and a Remove Fear scroll. Follow the hallway left of the idol, but be careful as there are three traps. Disarm them and follow the hallway until it ends. You will find a shelf (259, 326) containing Leather Armor +1 and a Cure Light Wounds scroll. In the northeast of the area, you will find a sarcophagus (763, 166) containing a Healing Potion, a Grease scroll, a Strength scroll, a Potion of Genius, and a flawless Two-Handed Sword (1-10 damage, +2 THACO). There is a trap (969, 515) in the southeast corner of the map that we could not detect. If you set it off, it will spawn shadows.
- Cave Three (AR3201) Upon entry to this area, you will be attacked by skeletons and ghouls. In the area left of the entrance, you will see a row of small statues. Look in the center statue (183, 578) to find a Chant and Find Traps scrolls. In the area right of the entrance, you will find a shelf (776, 461) containing a Mummy's Tea and one Healing Potion. In the northeast corner, you will find a trapped sarcophagus (859, 316). There is another trap near the sarcophagus that we could not detect, which if you trip it, will spawn skeletons. Inside the sarcophagus, we found a Bastard Sword, Chainmail +1, a Potion of Infravision, and scrolls of Infravision and Protection from Evil .
- Cave Four (AR3301) You will have a forced dialogue with Therik (683, 713), a servant of Myrkul, Lord of the Dead, upon entering this area. You must kill him. He carried a Potion of Action Transference (permanent +1 to charisma, -1 to dexterity) on his body. You will also be attacked by any number of other undead as you proceed though this area, including ghouls, skeletons, shadows, ghasts, and the like. If you continue straight from the entrance, you will wind your way down until you reach the steps to the lower level of the room. As you proceed (before going down the steps), you will find yet another skeleton (1543, 301) hanging on the northern wall with a few items. There is a trap just past the skeleton; disarm it and proceed down the steps. There are two rooms on the lower level. In the northern-most room, you will a skeleton (1638, 580) hanging on the northern wall as well as a sarcophagus (1914, 795). We found an Invisibility scroll on the skeleton, and a scroll of Color Spray, a Potion of Strength, and a Dagger +1 (2-5 damage, +1 THACO) in the sarcophagus. The trapped sarcophagus (1780, 1259) in the southern room contained the Sanctum Key, Broken Armor, a Potion of Insulation, and a Chill Touch scroll.
- Cave Five (AR3001) If you walk west from the statue, you will find a path that leads to this cave. Near the entrance you will encounter a Yeti chieftain (2028, 1416). Kill him and search his body to find Mirek's heirloom, which you can return to him once you go back to Kuldahar, and a War Hammer +1 (3-6 damage, +1 THACO). Inside the cave, be sure to click on the tent in the northwest corner. By doing so, you will learn that something other than yetis inhabits the cave. Remember this location, as you will return to this cave once you speak with Kresselack. There are four crates here (311, 420; 346, 437; 364, 411; 388, 385) ready to plunder. We found the following: Mace +1 (3-8 damage, +1 THACO), Chainmail, Potion of Agility, Potion of Fire Resistance, Potion of Freedom, 2 Healing Potions, Prayer scroll, Glyph of Warding scroll, Potion of Genius and various gems.
- Entrance/Exit This path is where you start and where you go to get back to Kuldahar.
- Tomb of Kresselack Kresselack's tomb is where the fun starts in the Vale of Shadows. There are three levels to this area, and each is crawling with increasingly powerful undead. If you need to restock or heal, now is the time to return to Kuldahar and get what you need to proceed. If you return to Kuldahar at this point, look in front of the potter's home (2089, 1709) to find Mirek ("frightened townsperson") and return his heirloom.
Walkthrough Index
|