Burial Isle Barrow
(AR 9400)
The monsters are a little tougher here, as you will face legions of drowned dead, not to mention wailing virgins and barrow wights. The drowned dead have high resistance to crushing and missile attacks, and the virgins are immune to cold damage, not to mention many spells (Charm, Hold Monster, Petrification, among others) so tailor your attacks accordingly. Missile weapons are very effective against the virgins, as are any spells that help your saving throws, since they are prone to casting Mournful Wail, War Cry, and Undying Lament. Again, be aware that these monsters are of neutral alignment, and thus will be unaffected by Holy Smite; however, turn undead can still be quite effective. Important locations are noted below.
Monsters: Barrow Wight, Wailing Virgin, Drowned Dead, Mebdinga, and Vexing Thoughts.
Areas of Interest
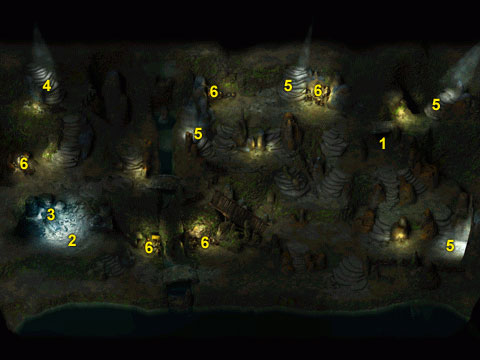
- Vexing Thoughts: Vexing Thoughts (3076, 1150), is a demon who has taken the form of armor, talking armor, in fact. You have several options when dealing with him. Ask what you must do to enter his service, and he will say you must kill an innocent. Once you have done so, or if you have already done so, you must then dedicate the murder to the tanar'ri. This will enable you to wear the armor, which at this point has an AC of 1, and grants 100% resistance to cold and +2 to constitution. Note that if you summon the demon using this method, by using the armor's special ability, the character wearing the armor will be gibbed and the demon will attack you. The same thing will happen if you try to command him by making him submit to your will without knowing his name, the only difference being that you have no option to wear the armor--the character wearing it simply gibs and the battle is on. If you choose one of these two methods and end up fighting the demon, he is worth 12,000 XP. He is no easy foe, however, as he has 120 hit points, a -7 base AC, and gets 5 attacks per round with a strength of 22; he is also prone to casting spells, especially Power Word: Stun.
If you would rather not have one of your characters permanently destroyed, you can wear the armor and summon the demon without fear if you have a mage capable of casting Contact Other Plane. Use this to learn the demon's true name (Chalimandren), then use his name to force him to submit to your will. This will enable you to wear the armor, which will now have increased abilities: AC 1, 100% resistance to cold, +2 to constitution, ability to cast Firestorm once per day, and the ability to summon the demon one time without fear of harm. The armor will disappear after you summon him, so make sure you don't throw away your old armor. Also, be careful where you summon him, as he doesn't seem inclined to follow you around.
- Mebdinga: The wailing virgin Mebdinga (201, 1911), a former member of the Bear Tribe, was sacrificed so that she could attend to Wylfdene in the afterlife. She will tell you of the poisoned soul who took Wylfdene's body, thus disturbing his eternal rest. She will demand that you leave. If you refuse, a huge fight ensues, involving several drowned dead, wailing virgins, and Mebdinga herself. Thus, before speaking with her, you may want to cast protection spells to lower your saving throws; also, try to kill her quickly. If you do not, she has the nasty of habit of casting Death Knell on one of your party members. Once the battle is over, heal if possible, because there are more drowned dead and wailing virgins to the south. Be sure to check Wylfdene's Sarcophagus, which we will discuss next. Mebdinga, like the other undead in this area, is neutral; thus, Holy Smite will not affect her. She has 100 hit points, a base AC of -8, low saving throws, and is worth 4,500 XP.
- Wylfdene's Sarcophagus: After dispatching Mebdinga, be sure to check this sarcophagus (436, 1788). In it you will find 735 gold and Wylfdene's Tribal Insignia, which you will need to progress the plot when speaking to Hjollder. The barbarians hold such items in very high esteem, and the fact that it was desecrated shows that whatever inhabits Wylfdene's body is not a barbarian, and certainly is not Wylfdene.
- Passage to Hjollder: Once you have attained Wylfdene's Tribal Insignia and are finished exploring the Barrows, use this passage (332, 615) to reach the previously inaccessible section of the outside area of the Burial Isle. There you will find Hjollder (385, 352), and will gain 280,000 XP for your trouble. Tell him that the spirits of the isle have told you that Wylfdene is not what he seems. He will say that he requires proof to act against his king. Present him with Wylfdene's Tribal Insignia to gain 420,000 XP. A barbarian's tribal insignia is the most precious of their worldly possessions so the fact that it was defaced and left behind is proof enough that whoever took Wylfdene's body is not a true barbarian. Hjollder will then tell you of the Seer in the Gloomfrost, a channeler of spirits from that Tribe of the Elk who may be able to divine the true nature of Wylfdene. Your mission is to go to the Gloomfrost and speak with the Seer. Meanwhile, Hjollder will go to the Barbarian Camp and await your return. Once you have spoken to the Seer, he will be waiting for you at the Great Mead Hall, where you will expose the true identity of Wylfdene.
Note: Do not take this passage until you are finished exploring/gathering loot. Why, you ask? Because many of the monsters will respawn. Also, do not go to Gloomfrost until you have returned to Lonelywood. Why will be discussed at the end of this section.
- Exits: All of these passages lead back to outside to the Burial Isle.
- Treasure: There is quite a bit of loot to be had in the Barrows:
- (2585, 825): Elixir of Health, Protection from Cold scroll.
- (2544, 760): 525 gold, Svian's Club.
- (2459, 767): 153 gold, 12 horn coral gems.
- (1867, 756): 4 water opals, Battle Axe +1, Chainmail +1, 21 Arrows +2.
- (1707,756): 318 gold, the short sword Blood Iron.
- (1683, 840): pelt, Cloak of Displacement.
- (274, 1357): Holy Smite and Blade Barrier scrolls, 6 moonbar gems, 169 gold.
- (233, 1361): 325 gold.
- (1273, 2016): 2 Heal scrolls, pelt, 12 Inferno Arrows +2.
- (1240, 1945): 740 gold, the axe Young Rage.
- (1187, 1918): the Battle Axe +3 Fatigue.
- (1728,1937): jade ring, High Quality Battle Axe, Small Shield +1.
- (1533, 1991): 309 gold, High Quality Bastard Sword.
Once back in Lonelywood after finishing the Burial Isle, go speak to Doogal. You will find that Dolan has also been killed by the renegade wolf. Doogan thinks it was a magical wolf that killed his brother, and that Emmerich is behind it all. Then go speak to Emmerich. He wasn't at home the first time we went there, so we went to rest and then went back. Once you find him, he will mention that Doogal has approached Kieran Nye about purchasing a magical weapon, and will advise that you speak to him about it. Go speak to Kieran, who will mention the possibility that the wolf was a werewolf. Then return and speak to Emmerich. Tell him what Kieran said about the wolf, and discuss the possibility that the wolf who attacked him was a werewolf. Emmerich will speak of the nightmares he has been having, and you will eventually discover that he has been infected with lycanthropy by the wolf and will gain 420,000 XP for the discovery.
Once the discovery is made, you can either kill him or try to help him. If you kill him, you will gain 1,400 XP and the following items: Shadowed Cloak, 16 Confusion Arrows +3, 20 Inferno Arrows +2, 20 Arrows of Piercing, 100 gold, Bracers of Archery, Finest Long Sword, three Potions of Extra Healing, Long Bow +4 Hammer.
If you would like to help him, speak to Kieran again. Ask if he knows of any way to help Emmerich, and he will give you Selune's Caress. While the amulet will not cure lycanthropy, it will keep the effects at bay as long as it is worn. Return the amulet to Emmerich for 420,000 XP.
If you roam around Lonelywood at night before curing Emmerich, you may encounter a werewolf. If you would like to help Emmerich, I would advise against killing it. It will flee after it is sufficiently injured. On a side note, you will notice that Purvis changes his locale once the Three D's start keeling over. You can find him just southeast of his home, near the fresh graves (3676, 1714). Speak to him for some scintillating conversation. Once finished with the Emmerich quest, you are ready to proceed to Gloomfrost.
Walkthrough Index
|