|
|
Barbarian Camp, Part 2
(AR 9200)
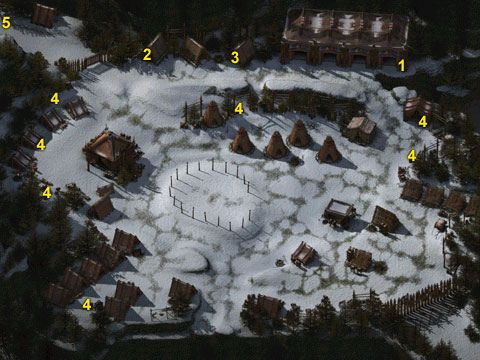
Once back at the Barbarian Camp, speak to Angaar (647, 406) if you didn't kill him earlier and tell him you've passed the test of Tempos and wish to see Wylfdene. Once inside, you will be able to goad Wylfdene (931, 494) into gazing into the mirror/amulet to see what "truth" it holds (the mirror you gained from Tiernon in Gloomfrost). It seems the creature inhabiting his body is indeed vain, as the sight of its newfound image is too much for it to bear. Shocked by its appearance, the creature will drop its present form and show itself to be Icasaracht, the great matron of the white wyrms.
If you have not killed the Seer (792, 534), she will appear at this point and engage Icasaracht in a rather dramatic dialogue. The Seer will taunt Icasaracht, asking that she look deeply into the mirror, to see what she has become. Icasaracht will become enraged, venom spewing from her every word as she describes how Aihonen broke her heart and destroyed all that she held dear. Provoking the dragon proves to be less than a prudent move, as Icasaracht strikes a mortal blow to the Seer before fleeing the scene.
Following a brief dialogue in which the Seer tells you how and why she conquered her fear of death, she will die before your eyes (there is no way to heal her). Then, the battle is on.
Once the Seer dies, or once the dragon flees if you have killed the Seer, all of the tribes will begin to attack the Wyrm Tribe, and there will be quite a melee in the mead hall. Be extra careful not to hit any of the friendly barbarians with area spells or any stray melee and missile attacks. If you do, all of the barbarians will become hostile, and you will unable to proceed to the next area. Once you have killed all the hostile barbarians in the mead hall, search the Seer's body (if she appeared) to find the Wailing of Virgins cloak. There is nothing else of value in the hall. Exit the mead hall through the door in the southeast corner of the room, which will take you to Beornen.
Monsters: Wyrm Tribe Warrior.
Areas of Interest
- Beornen: Exit the mead hall through the southeast door to find Beornen (3218, 619). Ask him about the creature, and he'll tell you that he knows it is Icasaracht, the matron of the white wyrms and you will gain 120,000 XP for discovering her identity. Beornen knows where she has fled, and will offer to take you to the Sea of Moving Ice to find her. Do not leave just yet as you still need to finish off the Wyrm Tribe, loot the area, and must return to Lonelywood before moving on. When finished speaking with him, go back inside the mead hall and exit through one of the other doors to join the battle. Note that the pathfinding of all the barbarians attacking the Wyrm Tribe may lag your game a bit--just be patient. You don't have to do anything at all, really. If you want, you can just stand outside until the other barbarians have finished off the Wyrm Tribe. Once they are defeated, you will gain 300,000 XP.
- Hjollder: Hjollder (1139, 536) will tell you what you should already know if you have spoken with Beornen: Icasaracht has likely fled to the Sea of Moving Ice. He does have a little additional information, however. It seems that virgins have recently been taken there to be sacrificed, which is a strong indicator that Icasaracht has taken up residence in the area. He can also take you to the Sea of Moving Ice (with the aid of the Tribe of the Grey Whale), but don't go yet as you have looting to do, and need to return to Lonelywood before moving on. If you would like to irrevocably screw up your game, you can kill Hjollder and gain a War Hammer +4: Defender.
- Jorn: Jorn (1886, 507), cousin to Wylfdene and shaman to the Tribe of the Bear, can heal your party if such is necessary.
- Treasure: you will find quite a bit of loot in the area, so be sure to gather it all before proceeding back to Lonelywood.
- Barrel (3395, 993): Halberd of Sparks +1.
- Barrel (3280, 1286): Ogien's Scale. This, like many other items, is random so what you find may vary.
- Barrels (904, 894; 1941, 887): Potions of Strength, Magic Shielding, and Fortitude.
- Barrels (707, 2445): Reinforced Large Shield +1.
- Barrel (363, 1590): Potion of Regeneration, Ring of Protection +2.
- Pack: (318, 1182): High Quality Long Sword, Potion of Extra Healing, War Hammer +2, Studded Leather +2.
- Barrel (420, 809) Potion of Healing, Elixir of Health.
- Exit: Use this exit to return to Lonelywood.
Once finished gathering the loot, return to Lonelywood for the final time before going to the Sea of Moving Ice. If you are injured, have Jorn heal you before leaving, as you will need to be at full strength.
Walkthrough Index
|
|
|