Western Towers
(AR 9701 - AR 9704)
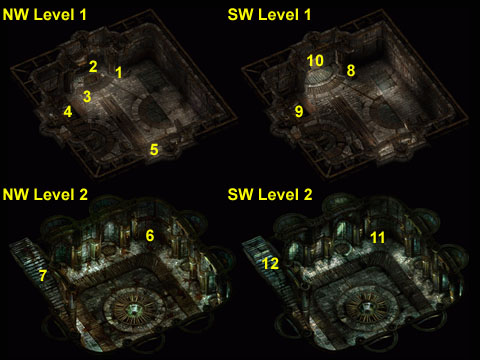
These are the western towers of the courtyard. You must go to each of these towers to collect the Tales of each Watchknight. You need said Tales to solve one of the Luremaster's riddles and gain entrance to the castle. All of the towers have a hidden door to a second level. To gain access to these levels you must hit a lever in another tower. We recommend you visit level one of each tower and pull the levers. After that, start exploring all sub levels and collect the Tales. We show you on each
map what lever opens which door.
The northwest tower level one (AR 9704) has no grand battle awaiting upon entry. Just a paladin named Harald, he is detailed below. Don't forget to click the lever and if you can, go downstairs
to level two (AR 9703).
The southwest tower entrance is guarded by a few wyverns. Inside, level one (AR 9702) holds a fight with a wyvern matron and her wyvern minions. Use your mage's area affect spells, because
this fight is a bit tough. Once the vile creatures are dead, click the lever and if you can, go downstairs to level two (AR 9701).
Monsters: Animated Plate, Earth Elemental, Fire Elemental, Ice Golem Sentry, Iron Golem, Water Elemental, Wyvern, Wyvern Matron

- Lever: This lever (590, 312) opens the hidden door to level two of the southeast tower. Make sure you click it.
- Harald: Walk right up and talk to Harald (468, 286) and you will find out that he was once a Paladin of Tyr. The lust of gold drove him to what he has become today. He lied to himself and his God, trying to convince himself that this thirst for wealth was for the church. That is what brought him to Castle Maluradek and ultimately his downfall. Harald will ask you to kill him. Now you have one of two choices to make. You can just ignore his plea for death (and his tears) and head downstairs to level two or you can kill him like he asks you to for a four-point reputation loss. On his dead carcass, you will find Mithral Field Plate Armor +2 (AC 0), a Golden Girdle (+3 vs. slashing weapons), Boots of Grounding (+50% electrical resistance), Gauntlets of Weapons Expertise (+1 hit, +2 damage), a Ring of Free Action and a Morning Star +4 (+4 hit and damage, AC bonus of +2, +15% magic resistance, +20% slashing and piercing resistance). There is no wrong or right in this situation. It's a moral decision you must make for yourself. Dead or alive, the game goes on.
- Treasure: On the floor you will find a Holy Symbol of Helm (439, 448). Pick it up and keep it with you as it is needed later.
- Stairway to Level 2: This is the stairway (291, 493) leading to level two. The hidden door to the stairway is only opened once you hit the lever in the southeast tower.
- Exit: This exit (885, 788) leads back out to the courtyard.
- Luremaster: The Luremaster (601, 198) shows up again and presents you a challenge to test your mettle. After he disappears, six animated plates appear ready for battle. Kill the walking scrap yards and you are awarded with the Tale of Sir Erris and 240,000 XP. Don't forget to loot the place, as all the animated plates are Plate Mail +1 (AC 2). Two of them have Bastard Swords +1 (+1 hit and damage), two have Long Swords +1 (+1 hit and damage) and two have Battle Axes +1 (+1 damage).
- Stairway to Level 1: This stairway (275, 515) takes you back up to the first level.
- Lever: This lever (568, 313) opens the hidden door to level two of the northeast tower. Make sure you click it.
- Stairway to Level 2: This is the stairway (311, 500) leading to level two. The hidden door to the stairway is only opened once you hit the lever in the northeast tower.
- Exit: This exit (379, 272) leads back out to the courtyard.
- Luremaster: The Luremaster (600, 206) is here once again and presents you with a challenge of intelligence. He will post a question to you that has six possible answers. If you just want to progress through the game swiftly, choose the correct answer of wind and get your reward of the Tale of Sir Giles and 240,000 XP. If you want to get some good experience points, answer the question incorrectly. Fire ports in fire elementals, earth ports in earth elementals, water ports in water elementals, ice ports in ice golem sentries and iron ports in three massive iron golems. Still want those experience points?
- Stairway to Level 1: This stairway (258, 481) takes you back up to the first level.
With the exploration of the towers complete, it is time for a nice long dungeon crawl. Go rest at Hobart's place and sell off the loot you found. Now with the Symbol of Helm and the Watchknights' Tales in hand, proceed back to the Chapel of Helm. Place the Symbol of Helm in the offering bowl (619, 244) and it will open a secret door (602, 295) leading to the Watchknights' Crypt. Undead killing time...
Walkthrough Index
|

