Watchknights' Crypt
(AR 9714)
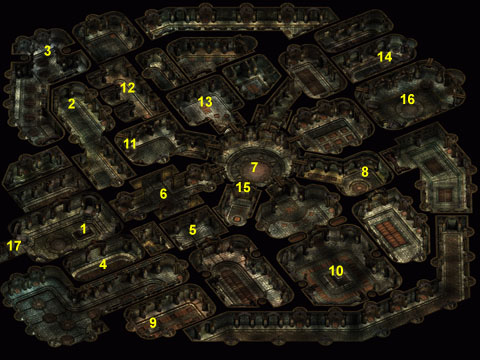
You enter the Watchknights' Crypt after you have placed the Holy Symbol of Helm into the offering bowl (619, 244) located in the Chapel of Helm. This area is big and there are quite a few things to do. First of all, you need to find the six keys that are described in the Manuscript of the High Watcher. You need these keys in order to gain entrance to the Watchknights' Tomb. Also, you need to have all four Tales in order to complete the Watchknights' Crypt, which you have already done in the towers. The riddle of this Crypt is that you need to put the Watchknights to rest. In order to do so, you need to place each Watchknights' Tale in their respective tombs. When you complete this task, you are finally allowed access to the castle. This crypt is full of secret doors and traps. Turn on your thief's find traps ability and you will have a 100% chance to find these secret doors. For your convenience, we have provided the following map showing you were all the secret doors are located.
Monsters: Blast Skeleton, Boneguard Skeleton, Crypt Thing, Ghost, Greater Mummy, Mummy, Ochre Jelly, Revenant, Skeleton Warrior, Wight
- Entrance: When you enter the crypt, you will find a trapped sarcophagus (662, 1841) sitting innocently in the middle of the first room. After you have your thief disarm the trap, look inside and you'll find a Heavy Crossbow of Accuracy (+7 hit, +2 damage), Bolts + 2 (+2 hit and damage), Broken Armor and a Broken Shield. On a shelf in northeast wall of this room are some sunstone gems and a little gold. If you walk into the room to the north you will find a secret door (349, 1513). Go through the door and dispatch of the boneguard skeleton and you will find three shelves that house a Disintegrate scroll (356, 1245), some gold, and moonbar gems.
- Copper Key: Find the secret door (652, 1478) on the east wall in the room above the entrance room and enter. You are attacked by some revenants, crypt things and skeleton warriors who are guarding a sarcophagus (571, 850) that holds the copper key. Crypt things can cast Teleport on your party members. This will cause your party members to be teleported to various places inside the crypt. Dispatch of them, and you have the first key. Don't forget to get the Long Swords +1 (+1 hit and damage) the skeleton warriors drop.
- Silver Key: The hallway leading to the silver key is full of blast skeletons. The room at the end of this hall holds the silver key and is guarded by boneguard skeletons and crypt things. After killing them, loot the sarcophagus (387, 426) that holds the silver key. You now have two of the six keys you need.
- Treasure: In this room, there are six shelves that hold the Boots of Avoidance (619, 2112; +5 AC vs. missile weapons), a Ring of Holiness (898, 1971; extra priest spell from level 1 to 4), a few Static Darts +3 (609, 2061; +3 hit and damage, +2d3 electric damage) and some gold. To the south there is a secret door (949, 2233) that goes to a room full of boneguard skeletons, blast skeletons and crypt things. You do not even need to go to this area if you do not with to. There is no treasure. If you want the experience points go clear the room of the vile undead. There is also a secret door (1337, 2401) leading south from this room, but for consistency sakes ignore this door for now.
- Treasure: Going through two secret doors (1095, 2005; 1312, 1943) you find a room full of wights, revenants and crypt things. Clear the room of monsters and search the shelf to find a Girdle of Bluntness (1470, 1779; +4 AC vs. blunt weapons). There is a secret door (1736, 1810) on the east wall. Just ignore it for now. In the room to the south, there is a huge pile (1900, 2292) of treasure. Lots of gold and gems. The pile of loot is surrounded by 17 traps and will deal out heavy damage if you don't disarm them. Now head back to the entrance of the dungeon. Look on the east wall and you will find a secret door (905,1766) that leads to the circular room.
- Treasure: Going through the secret door (905,1766) that leads to the circular room, you must travel through a hallway that is filled with boneguard skeletons, blast skeletons, revenants, and crypt things. Slap them down with the Ghostbusters action and search the shelves for loot. We found Bolts +2 (1438, 1476; +2 to hit, +3 damage), a Domination scroll (1102,1617), and a Morning Star of Lesser Phasing (1087, 1598; +2 to hit and damage, 15% chance to phase target, 25% chance 1d3 cold damage). When done looting, head to the east into the circular room.
- Circular Room: The circular room itself is filled with crypt things. This is where you will use the keys that you have been collecting in the crypt. All the doors here must be unlocked before you can gain access to the Watchknights' final resting place.
Going clockwise from where you enter, which will be door number one, the keys will open the following doors:
- Entrance (1749, 1416) to the circular room.
- The platinum key opens this door (1741, 1247).
- The gold key opens this door (1873, 1108).
- The electrum key opens this door (2138, 1086).
- The door (2347, 1194) to the tomb of the Watchknights.
- The silver key opens this door (2398, 1380).
- The copper key opens this door (2234, 1534).
- The bronze key opens this door (1956, 1561).
Kill all the crypt things and unlock the silver-key door.
- Platinum Key: After using the silver key, go through the door and kill the revenants and crypt things that are guarding the sarcophagus (2913, 1390) in this room. Look in it to find the platinum key. The room to the south holds nothing of importance other than a few boneguard skeletons. If you want the experience points, move on down and take them out. Now go to the room to the east.
- Electrum Key: Head south using your thief to find and disarm the many traps. You will find a secret door (3619, 1798), open it and continue on down this long hallway killing the skeleton warriors and crypt things. Don't forget that skeleton warriors drop Long Swords +1 (+1 hit and damage). The end of the long romp leads to another secret door (1644, 2651). This room holds a sarcophagus (1231, 2630) that is guarded by a crypt thing, boneguard skeletons and ghosts. You know what to do with that riff-raff. Open the sarcophagus and grab the electrum key. At the top of this room, there is the hidden door mentioned earlier in the walkthrough. This leads out towards the main entrance. Exit either way you choose and return to the circular room and unlock the copper-key door.
- Gold Key: After using the copper key, head into the room and you'll be greeted by a horde of wights, boneguard skeletons, revenants, and crypt things. After obliterating them, walk into the next room to deal with some mummies, skeleton warriors, and a greater mummy. They are guarding the sarcophagus (2702, 2200) that holds the gold key. After you kill them all, grab the gold key along with the Wand of Trap Detection that the greater
mummy drops and the Long Swords +1 (+1 hit and damage) dropped by the skeleton warriors. Head back to the circular room and unlock the platinum-key door.
- Treasure: Using the platinum key, you are finally able to open this door. Inside there are ghosts, crypt things, and revenants. They are guarding a trapped sarcophagus (1009, 1183) that holds Studded Leather of Resistance +3 (AC4, 15% resistance to piercing, slashing, fire and electrical damage, +2 to saves vs. spells), a Reinforced Large Shield +2 (AC +3, +1 vs. missile weapons, 15% resistance to crushing and fire damage) and a Shocking Flail +4 (+4 hit, +5 damage, 50% chance of 2d3 electrical damage, 10% chance target is stunned). On the north wall, you will find a secret door (1256, 999) for you to open and explore.
- Treasure: The previously mentioned secret door leads to a hallway that has some boneguard skeletons and a crypt thing. After killing these monsters, loot the six shelves in the hallway for a Bastard Sword +3: Incinerator (886, 776; +3 hit and damage, 50% chance of 1d8 fire damage, 10% chance target is stunned), and some Static Darts +3 (1002, 910; +3 hit and damage, +2d3 electric damage). After grabbing all of this, you'll notice another hidden door (905, 554) at the end of the hall. In the room through this door, there are some wights, boneguard skeletons, and crypt things. There is nothing of interest in this room, except for the experience points. Head back to the circular room and open the gold key door.
- Battles: After using the gold key on the door, send your thief in to look for traps and disarm them. There are two hidden doors in this room. Go through the left one (1427, 781) and kill the revenants. Go back and go through the right one (1637, 708). This room is filled with ochre jellies and boneguard skeletons. After killing them, find yet another secret door (1915, 580) to the small room and kill the ghosts inside. There is nothing of interest in these rooms, just the battles if you want the experience points. Head back to the circular room and open the electrum-key door.
- Bronze Key: Use the electrum key to open the door and take out the boneguard skeletons, crypt things and ghosts. There is a hidden door (2703, 636) in this room that takes you to a room with more evil and vile crypt things and revenants. Kill them and grab the bronze key from the sarcophagus (3086, 509) in the room. There is a hidden door (2934, 422) in this room, which leads to an empty room. In the empty room there is another secret door (2624, 287). This leads to a long hallway filled with skeleton warriors and crypt things. Other than experience points, the only thing here is the Long Swords +1 (+1 hit and damage) dropped by the skeleton warriors. Head back to the circular room and use the bronze key to gain access to the Watchknights' final resting place.
- Final Lock: There is one final door to unlock so you can gain access to the Watchknights' tomb. Open the bronze-key door and take out skeleton warriors, crypt things and revenants. Unlocking this door opens the door to the Watchknights' tomb. There is a secret door (1736, 1810) that was mentioned earlier in the walkthrough that gives you access to the entrance. Grab the Long Swords +1 (+1 hit and damage) dropped by the skeleton warriors if you want and head back to the circular room and the Watchknights' tomb door.
- Watchknights' Tomb: There is one more fight between you and the Watchknights' tomb. The room right before the tomb is filled with skeleton warriors, crypt things, and revenants. After you defeat these monsters, head into the next room via the secret door (2890, 965). Here, you finally finish this puzzle the Luremaster has presented to you. You need to put the Watchknights to rest. To do so, you must place each of their Tales in their tombs.
In the northwest tomb (2975, 841) you place the Tale of Sir Erris. The ghost of Sir Erris (3190, 859) appears, and tells you his honor has been restored. Inside the tomb you find a Two Handed Axe +2: Life Giver (+2 hit and damage, 10% chance to heal self +2d3).
In the northeast tomb (3414, 662) you place the Tale of Sir Geddian. The ghost of Sir Geddian (3331, 825) appears, and tells you he can finally rest. Inside the tomb you find a Long Sword of Action +4 (+4 hit and damage, 15% slashing resistance, +1 bonus attack per round) and a Reinforced Large Shield +2 (AC +4, +1 vs. missiles, 15% fire and crushing resistance).
In the southwest tomb (3151, 1015) you place the Tale of Sir Giles. The ghost of Sir Giles (3257, 931) appears, and says a small blessing from Helm. Inside the tomb you find a Mace +1 (+1 hit and +2 damage).
In the southeast tomb (3555, 845) you place the Tale of Sir Zierkki. The ghost of Sir Zierkki (3357, 893) appears, and says that all the Watchknights are free and that the way is clear now. Inside the tomb you find a Spear +1 (+1 hit and damage).
You gain 840,000 XP and you now have access to the castle. Leave the Watchknights' Crypt and go talk to Hobart Stubbletoes and demand information. Hobart has a lot of information on why you are here and what has been going on for many years. Sell off anything you want and buy potions and such. After shopping head to the castle entrance.
- Exit: This is the exit (25, 2052) that takes you back to the Temple of Helm and then to the courtyard.
Walkthrough Index
|
